boot-from-nvme
Vivid Unit comes with an M.2 connector and you can connect an NVME SSD to it.
SSD will give you much bigger storage space (Vivid Unit has 32GB eMMC storage) and better read/write speed. However the advantage of booting from SSD instead of eMMC is rather limited -- you will only see one or two seconds faster on boot. It is usually acceptable to let the device boot from eMMC while using NVME SSD as extra storage.
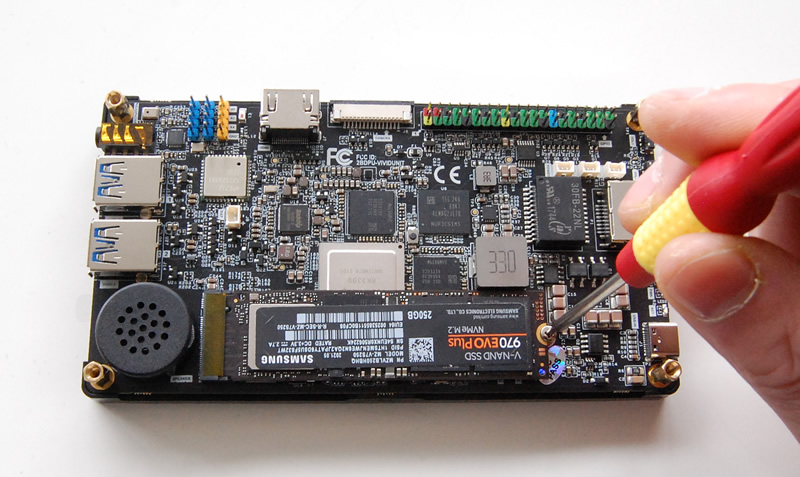
First you need to connect your NVME SSD to the M.2 connector on the back of VIvid Unit, use an M2 screw to seure it, and then you can boot up the system. Run "lsblk" to confirm the name of SSD device.
vivid@vivid-unit:~$ lsblk
NAME         MAJ:MIN RM   SIZE RO TYPE MOUNTPOINT
mtdblock0     31:0    0     8M  0 disk
mmcblk0      179:0    0  29.1G  0 disk
├─mmcblk0p1  179:1    0     4M  0 part
├─mmcblk0p2  179:2    0     4M  0 part
├─mmcblk0p3  179:3    0     4M  0 part
├─mmcblk0p4  179:4    0    64M  0 part
├─mmcblk0p5  179:5    0   128M  0 part
├─mmcblk0p6  179:6    0    32M  0 part
└─mmcblk0p7  179:7    0  28.9G  0 part /
mmcblk0boot0 179:32   0     4M  1 disk
mmcblk0boot1 179:64   0     4M  1 disk
nvme0n1      259:0    0 232.9G  0 disk
└─nvme0n1p1  259:1    0 230.5G  0 part
In the example above, the SSD is /dev/nvme0n1p1 and is currently not mounted.
If you do want the device to boot from NVME SSD, you can migrate the root file system to SSD. Below are the instructions.
sudo gdisk /dev/nvme0n1
Type 'o' to create a new empty GUID partition table (GPT). It will say "This option deletes all partitions and creates a new protective MBR. Proceed? (Y/N)", type 'y' and ENTER to proceed.
Type 'n' to add a new partition. It will ask for some sector parameters, type ENTER 4 times to use default setor parameters (this will create one partition for the whole NVME SSD).
Type 'w', then 'y' and then ENTER to save the partition data. REMARKS: THIS WILL DELETE ALL CURRENT DATA ON THIS SSD!
Run this command to format the newly created partition to ext4:
sudo mkfs.ext4 /dev/nvme0n1p1
Now you can migrate the root file system to SSD. Run this command in your Vivid Unit to download the script:
wget https://www.vividunit.com/download/scripts/change-rootfs-storage.sh
Make it executable:
chmod +x change-rootfs-storage.sh
Install the rsync package, which will be used by this script:
sudo apt install rsync
Now run the script:
sudo ./change-rootfs-storage.sh /dev/nvme0n1p1
After the script finish running, you can reboot the device. Run command "lsblk" you will see the NVME SSD is mounted to '/', which means the root file system has been migrated to the SSD.
vivid@vivid-unit:~$ lsblk
NAME         MAJ:MIN RM   SIZE RO TYPE MOUNTPOINT
mtdblock0     31:0    0     8M  0 disk
mmcblk0      179:0    0  29.1G  0 disk
├─mmcblk0p1  179:1    0     4M  0 part
├─mmcblk0p2  179:2    0     4M  0 part
├─mmcblk0p3  179:3    0     4M  0 part
├─mmcblk0p4  179:4    0    64M  0 part
├─mmcblk0p5  179:5    0   128M  0 part
├─mmcblk0p6  179:6    0    32M  0 part
└─mmcblk0p7  179:7    0  28.9G  0 part
mmcblk0boot0 179:32   0     4M  1 disk
mmcblk0boot1 179:64   0     4M  1 disk
nvme0n1      259:0    0 232.9G  0 disk
└─nvme0n1p1  259:1    0 230.5G  0 part /
By default the eMMC is no longer mounted. However the eMMC is still onboard and you can still use it as an extra 32GB storage. You just need to mount eMMC again. The command below is to mount eMMC to '/mnt':
sudo mount /dev/mmcblk0p7 /mnt
This eMMC still keeps its data. If you remove the NVME SSD, your Vivid Unit can still boot from its eMMC. However if you erase the data on eMMC, it will become un-bootable and you need to re-install OS to eMMC if you remove the SSD.